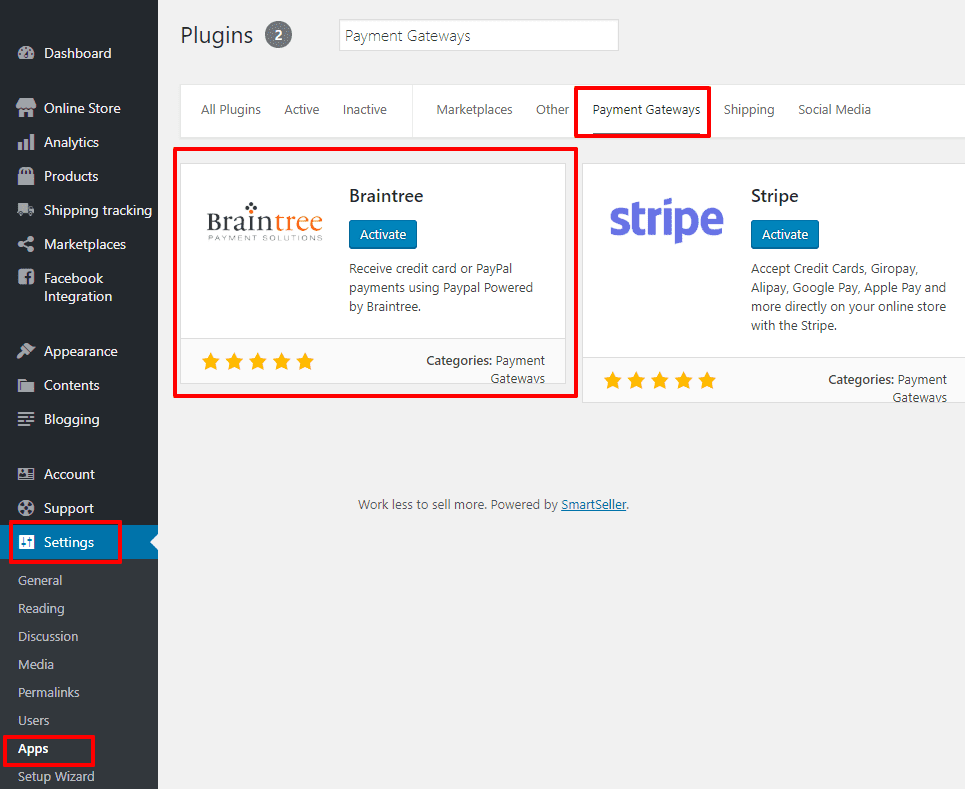
1. Activate Braintree
1.1. To activate your Braintree app, go to Settings > Apps > Payment Gateways > Activate Braintree.
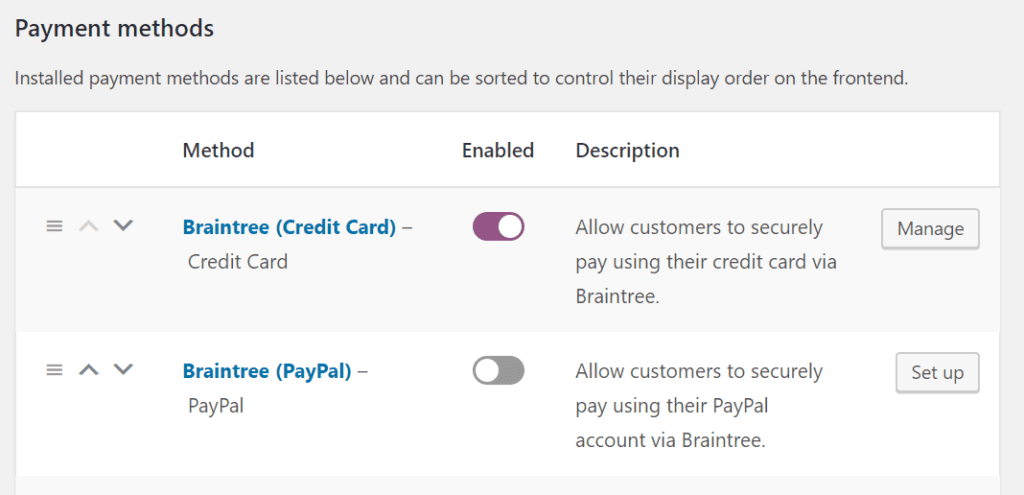
1.2. Once the Social Login App is activated, on dashboard go to Online Store > Settings > Payments > Braintree (Credit Card) / Braintree (PayPal).
2. Connect to Braintree
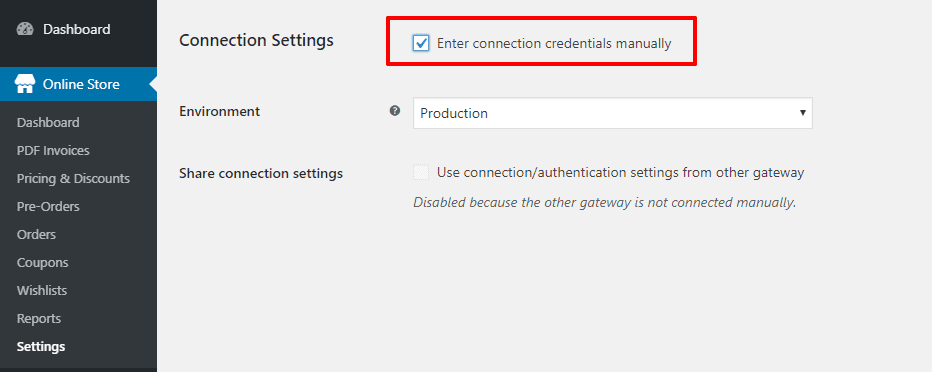
2.1. To connect to Braintree, go to Online Store > Settings > Payments > Braintree (credit card or PayPal). Scroll down to Connection Settings. Tick on “Enter connection credentials manually“.
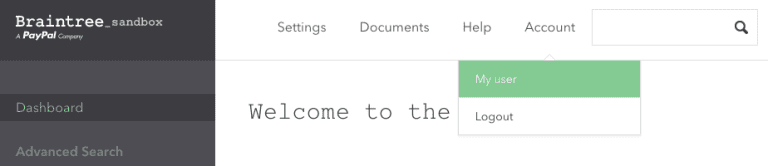
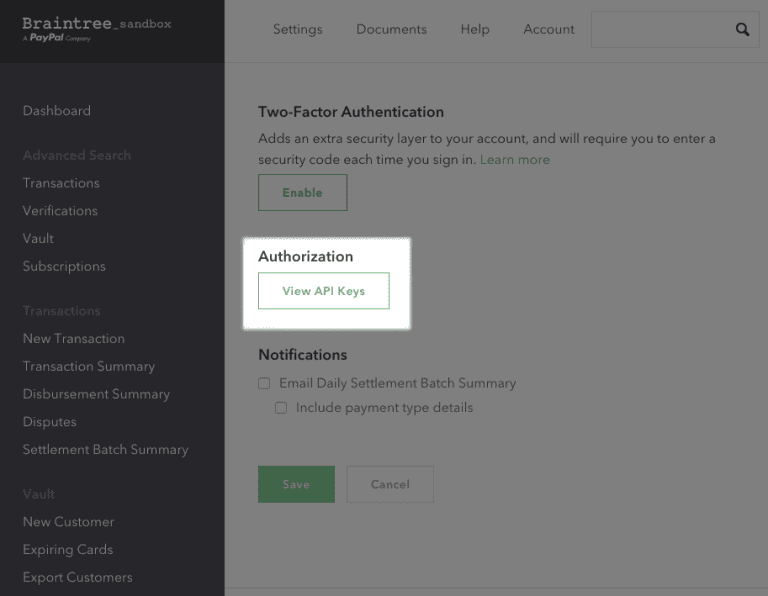
2.3. Login to your Braintree Control Panel. Go to Account > My User to access your user profile.
2.4. Click View API Keys under Authorization.
2.5. If you do not have any keys generated, click on button “Generate New” to create API Key. If you have generated keys, click “View“.
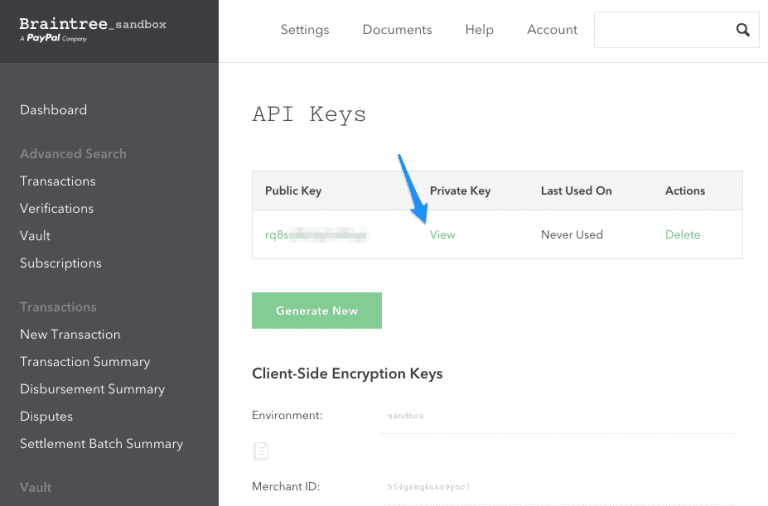
2.6. While viewing keys, you need to copy the Public Key, Private Key, and Merchant ID.
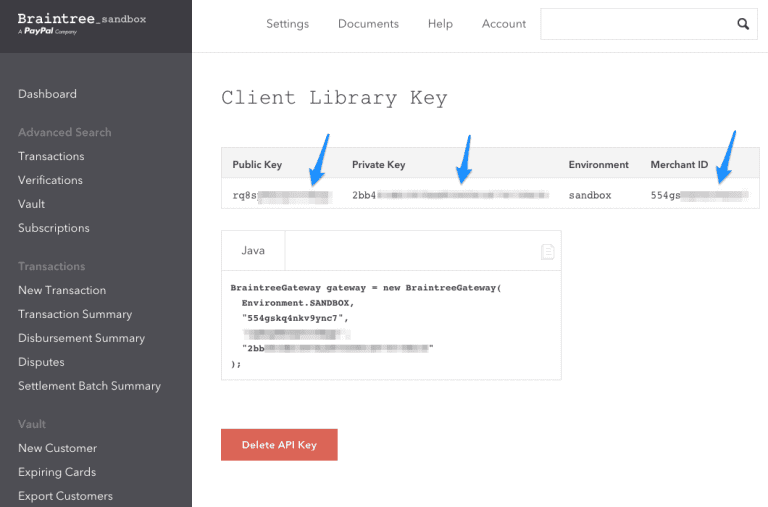
2.7. Now, go back to your SmartSeller dashboard. Go to Online Store > Settings > Payments > Braintree (Credit Card or Paypal). Paste the Merchant ID, Public Key, and Private Key to their respective text boxes on the settings page under Connection Settings.
3. Braintree Credit Card Settings
3.1 General Settings
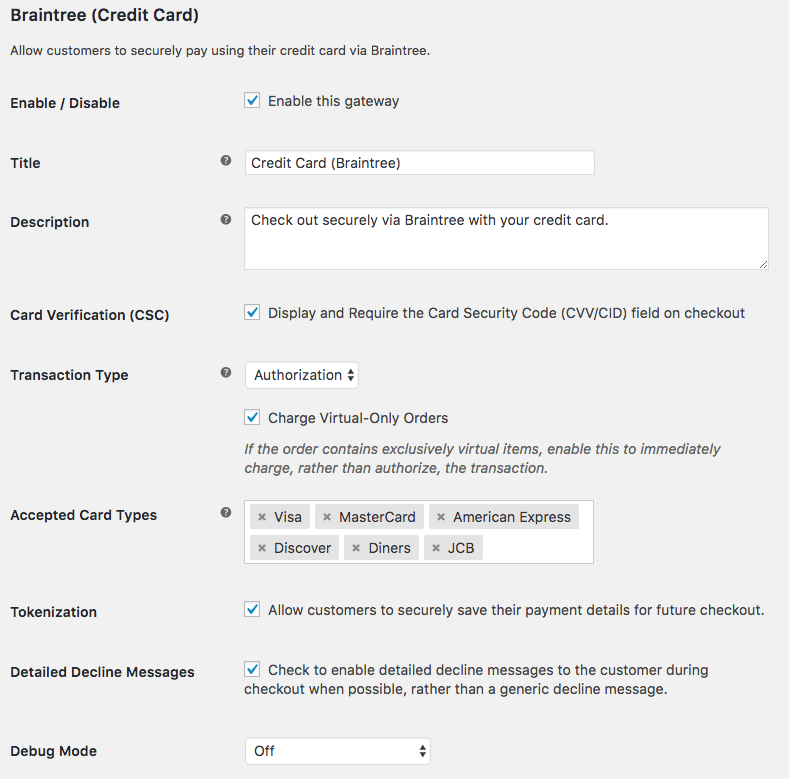
- Enable / Disable – Enables gateway as an option for customers in checkout.
- Title – This is the text shown for the payment during checkout and on the Order Received page.
- Description – Text shown under the title during checkout. Limited HTML is allowed. If you enable test mode, this section also displays a notice along with a test amount input.
- Card Verification (CSC) – Enable to require customers to enter their CVV / CV2 (Card Security Code) when checking out. Useful if you have requirements in your Braintree account for CV2 verification.
- Transaction Type – Controls how transactions are submitted to Braintree. Choose Charge or Authorization. Default is Charge. If you select Authorization, you must manually capture and settle payments in your Braintree control panel or on the SmartSeller Online Store orders screen after the transaction has been submitted. If you use the Authorization method, please note that different credit card types have a different expiry to this Authorization. E.g. you might need to Charge the card within 7 days after the authorization has been granted. For a full list of the credit card types and their expiry date, see the documentation at Braintree.
- Charge Virtual-Only Orders – (Shown if Transaction Type is set to Authorization) Enable to force charges on order containing only virtual items so they’re captured immediately instead of authorized (e.g., grant download access right away).

- Accepted Cards – Controls card logos that display during checkout. Purely cosmetic and has no affect on cards actually accepted by your merchant account.
- Tokenization – Enable to allow customers to save payment methods for future use at checkout. This must be enabled if you use Pre-Orders, and the vault must be enabled in your Braintree account.
- Detailed Decline Messages – Enable to display detailed messages to customers on reason for declines when possible instead of a generic error message.
- Debug Mode – Enable if having issues correctly processing transactions.
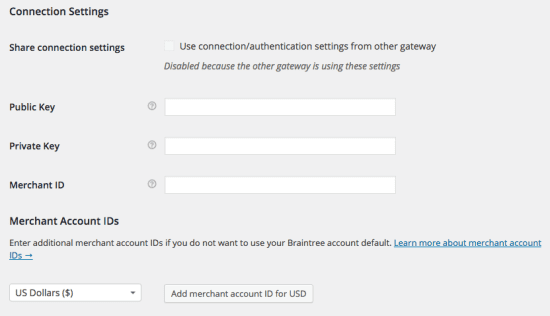
3.2. Connection Settings

- Environment – Switch between Sandbox and Production credentials. Set to Production to process payments. Note: You cannot use Sandbox credentials in Production mode. This is an separate sandbox environment that requires a separate login. You can sign up for a sandbox account here. Once you have done this, then use the provided Sandbox credentials.
- Share connection settings – Enabling allows you to use connection/authentication settings between the credit card and PayPal gateways. If enabled, you need to enter Braintree credentials in the PayPal settings to share them from.
- Merchant ID – Found in your Braintree account. (Follow steps 2.1 – 2.7)
Public Key – Found in your Braintree account. (Follow steps 2.1 – 2.7) - Private Key – Found in your Braintree account. (Follow steps 2.1 – 2.7)
3.3. Merchant Account IDs
This section only needed if you have different merchant accounts for multi-currency support.
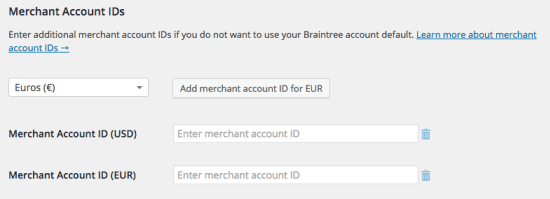
The different merchant IDs you entered here are then used to charge the appropriate currency. To add more merchant IDs:
3.3.1. Select the currency for this merchant ID in the dropdown.
3.3.2. Click the “Add merchant account ID for (currency)” button.
3.3.3. Enter the merchant account ID for this currency in the newly created field.
3.3.4. Repeat as needed for each merchant ID/currency.
3.4. Dynamic Descriptors
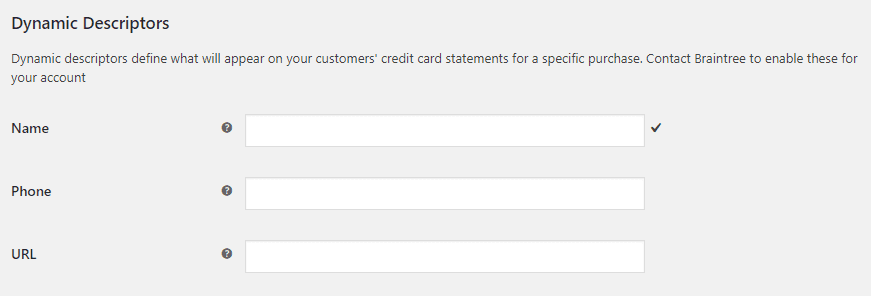
- Name – Name to display for the dynamic descriptor. Braintree requires this to be in a very specific format. (Scroll down to Step 5 for more details.)
- Phone (Optional) – Your phone number. Must be exactly 10 characters, and can only contain numbers, dashes, parentheses, or periods.
- URL (Optional) – Your website URL. Must be 13 characters or less.
3.5. Fraud Settings
Basic Fraud protection is enabled by default on your Braintree account. If you want to enable Advanced or Kount fraud detection, this must be enabled within your Braintree account. (Scroll down to Step 6.)
- Fraud Tool – Select which Fraud tool to use. Basic is enabled by default for all Braintree accounts. To use Advanced or Kount, these must be enabled for your account.
- Kount merchant ID – Shown if “Kount Direct†is enabled. You’ll get this from your Braintree representative.
- Phone (Optional) – Your phone number. Must be exactly 10 characters, and can only contain numbers, dashes, parentheses, or periods.
- URL (Optional) – Your website URL. Must be 13 characters or less.

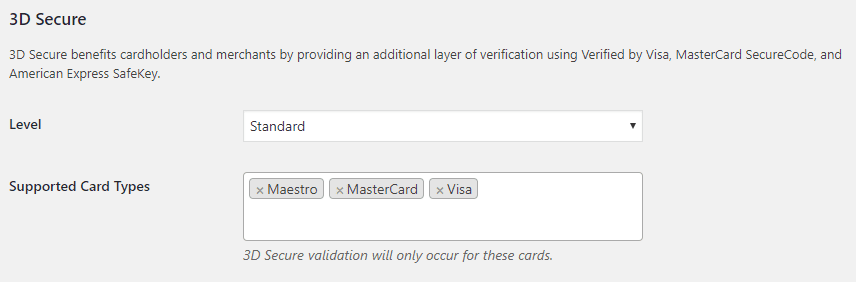
3.6. 3D Secure
Braintree supports verifying transactions via 3D Secure, but you must have 3D Secure enabled by your Braintree representative for your account. Please contact Braintree.
4. Braintree Paypal Settings
4.1. General Settings
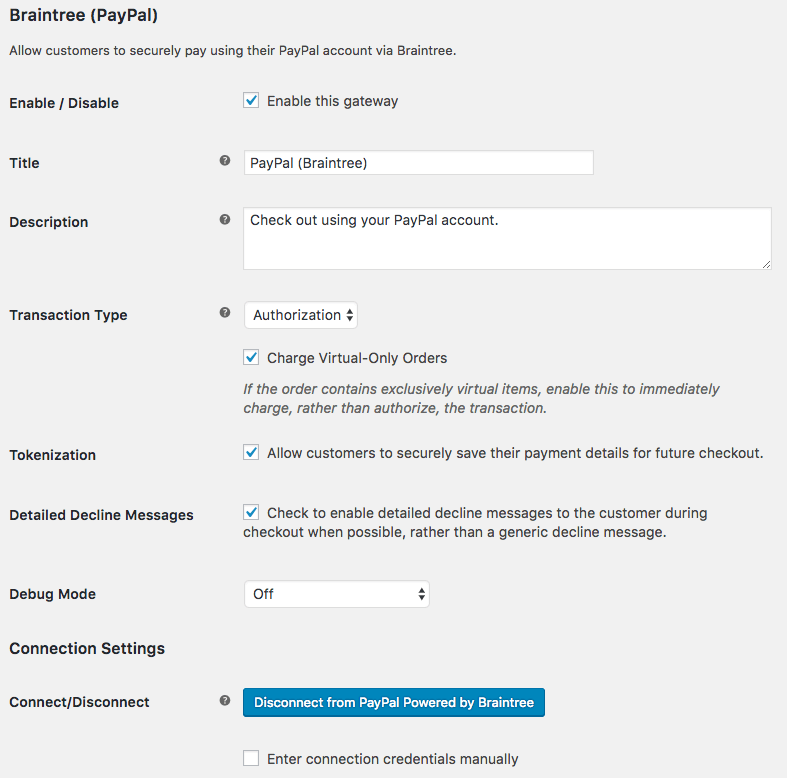
- Enable/Disable – Enables the gateway as an option to customers in checkout.
- Title – Text shown for the payment during checkout and on the Order Received page.
- Description – Text shown under the title during checkout. Limited HTML is allowed. If you enable test mode, this section also displays a notice along with a test amount input.
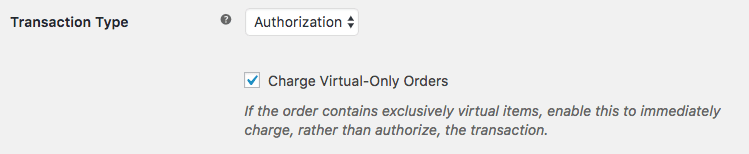
- Transaction Type – Controls how transactions are submitted to PayPal via Braintree. Choose either Charge or Authorization. Charge is default. If you select Authorization, you must manually capture and settle payments in your Braintree control panel or on the online store orders screen after the transaction has been submitted.
- Charge Virtual-Only Orders – (Shown if Transaction Type is set to Authorization) Enabling forces charges on orders containing only virtual items so they’re captured immediately instead of authorized (e.g., grant download access right away).
- Tokenization – Enable to allow customers to link PayPal accounts for future use at checkout. This must be enabled if you want to use PayPal for Pre-Orders, PayPal vault must be enabled in your Braintree account.
- Detailed Decline Messages – Enable to display detailed messages to customers to provide reasoning for declines when possible instead of a generic error message.
- Debug Mode – Enable if you are having issues correctly processing transactions. Do not enable unless you are having issues with this app.
4.2. Connection Settings
- Environment – Switch between Sandbox and Production credentials. Set to Production to process payments. Note: You cannot use Sandbox credentials in Production mode. This is an separate sandbox environment that requires a separate login. You can sign up for a sandbox account here. Once you have done this, then use the provided Sandbox credentials.
- Share connection settings – Enabling allows you to use connection/authentication settings between the credit card and PayPal gateways. If enabled, you need to enter Braintree credentials in the PayPal settings to share them from.
- Merchant ID – Found in your Braintree account. (Follow steps 2.1 – 2.7)
Public Key – Found in your Braintree account. (Follow steps 2.1 – 2.7) - Private Key – Found in your Braintree account. (Follow steps 2.1 – 2.7)
4.3. Merchant Account IDs
This section only needed if you have different merchant accounts for multi-currency support.
The different merchant IDs you entered here are then used to charge the appropriate currency. To add more merchant IDs:
4.3.1. Select the currency for this merchant ID in the dropdown.
4.3.2. Click the “Add merchant account ID for (currency)” button.
4.3.3. Enter the merchant account ID for this currency in the newly created field.
4.3.4. Repeat as needed for each merchant ID/currency.
4.4. Dynamic Descriptors
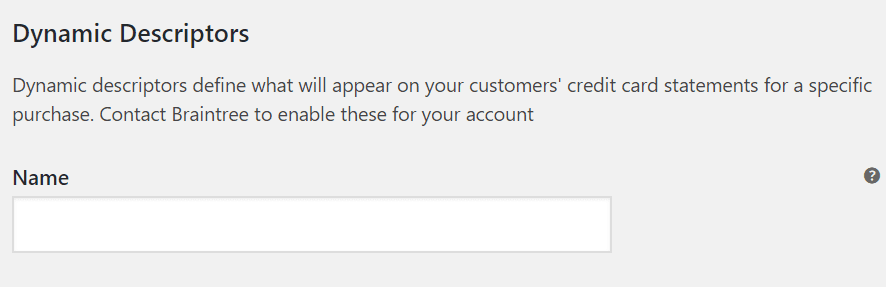
- Name – Name to display for the dynamic descriptor. Braintree requires this to be in a very specific format. (Scroll down to Step 5 for more info.)
5. Dynamic Descriptor Setup
Dynamic Descriptor Phone Numbers and URLs are optional, and have character limits. However, the Dynamic Descriptor Names must be in a very specific format (Braintree has details here). We recommend running a test transaction to confirm your format is valid.
There are three formats you may use, and letters must be separated by an asterisk:
- (3 letters)*(up to 18 letters) – 3 letters to represent company name, up to 18 letters to represent product name. Examples:
SMA*PRODUCTPURCHASESorÂSMA*CLOTHING - (7 letters)*(up to 14 letters) – 7 letters to represent company name, up to 14 letters to represent product name. Examples:
SMARTSE*ONLINESTORE orÂSMARTSE*CLOTHINGSTORE - (12 letters)*(up to 9 letters) – 12 letters to represent company name, up to 9 letters to represent product name. Examples:Â
SMARTSELLERS*CLOTHINGorÂSMARTSELLER*DRESS
6. Fraud and Verification Tools
If you want to use Advanced or Kount fraud prevention tools, you must enable these for your Braintree account. Advanced fraud tools, this can be enabled easily. Braintree has an overview of available tools.
If you want to use tokenization (linked accounts) with PayPal, you must enable advanced fraud tools to do so.
- To enable Advanced Fraud Tools, login to your Braintree Account, go to Settings > Processing, and scroll down to Advanced Credit Card Fraud Tools. Click Enable, and also Show Risk Data.
- To enable Kount Direct Fraud Tools, contact your Braintree representative to enable. You can then enable Kount Direct and enter your Kount merchant ID. Note that you must manually enter API credentials to use Kount.
If you’d like to use verification tools (3D Secure / Verified by Visa), contact your Braintree representative. Once enabled, use 3D Secure for Visa and / or Mastercard.
When enabled, Visa and Mastercard verification is presented to enrolled Visa and Mastercard users.
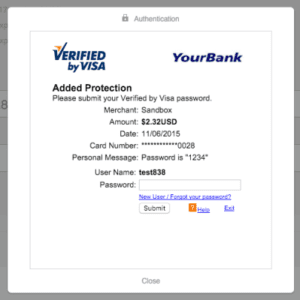
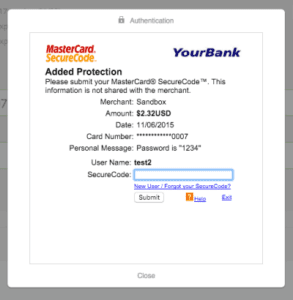
If a customer uses a saved Visa or Mastercard for a transaction, they are also presented with the verification screen.